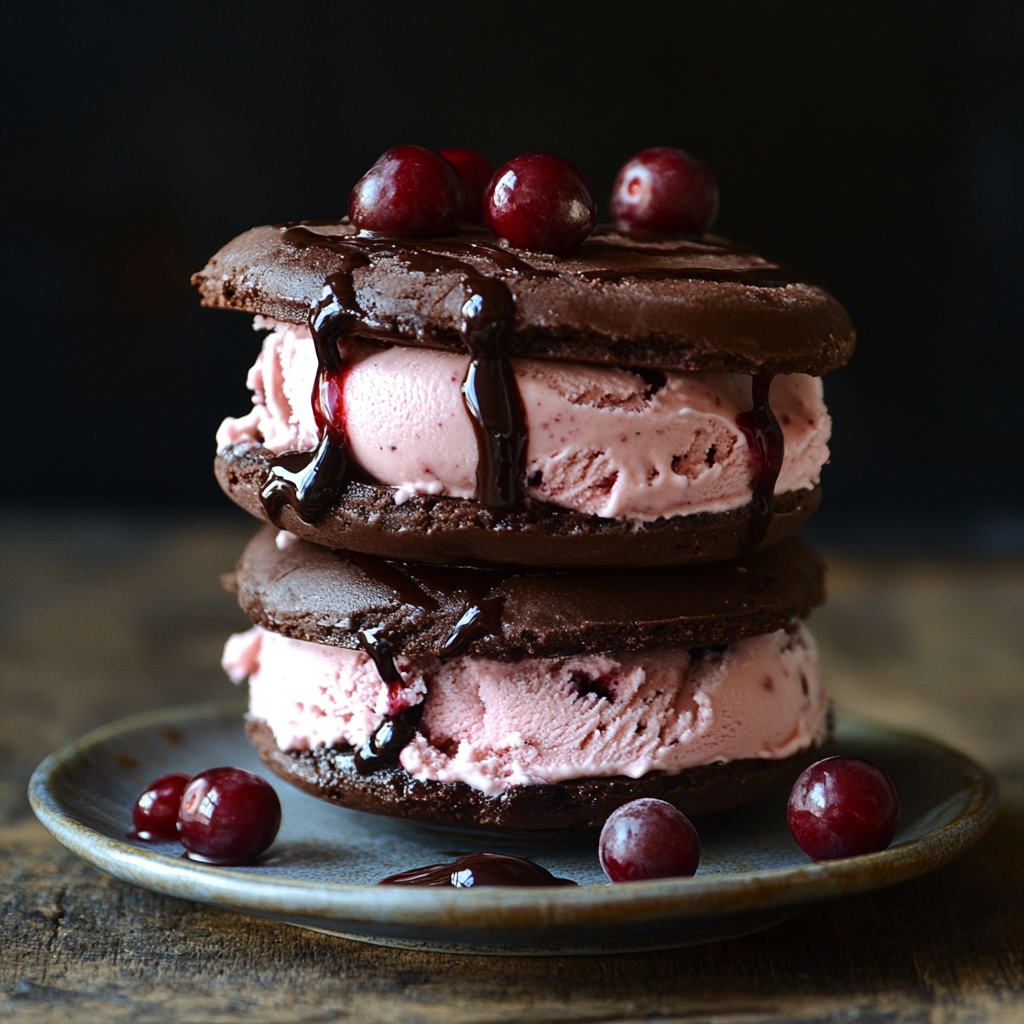
Chocolate Cherry Ice Cream Sandwiches
Rich, fudgy chocolate cookies meet creamy cherry ice cream in these delightful Chocolate Cherry Ice Cream Sandwiches. Perfect for any occasion, this treat is not only indulgent but also a healthier choice since it’s made without flour or dairy. Enjoy these sandwiches as a refreshing dessert on hot summer days or as a special snack to impress your guests. With their unique blend of flavors, they are sure to become a favorite!
Why You’ll Love This Recipe
- Easy to Make: With simple steps and minimal ingredients, you can whip these up in no time.
- Delicious Flavor Combination: The rich chocolate pairs perfectly with sweet cherry ice cream for a mouthwatering treat.
- Dairy-Free Delight: Enjoy a creamy dessert without any dairy—great for those with dietary preferences.
- Freezer-Friendly: These treats can be stored in the freezer, making them perfect for meal prep or unexpected guests.
- Versatile Dessert: Customize with your favorite fruits or toppings to add your personal touch.
Tools and Preparation
Before diving into this recipe, gather your tools to ensure a smooth cooking process.
Essential Tools and Equipment
- Mixing bowl
- Baking sheet
- Parchment paper
- Blender or food processor
- Cookie scoop
Importance of Each Tool
- Mixing bowl: A sturdy mixing bowl allows you to combine the cookie ingredients effectively without spills.
- Baking sheet: Using a baking sheet ensures even baking of your cookies, resulting in the perfect texture.
- Blender or food processor: This tool helps create a smooth filling, making it easy to spread between cookies.
Ingredients
To make scrumptious Chocolate Cherry Ice Cream Sandwiches, gather the following ingredients:
For the Cookies
- 1 cup (256g) Chocolate SunButter
- ⅓ cup (105g) maple syrup (or agave)
- 1 tbsp tapioca starch (or cornstarch/arrowroot)
- ½ tsp baking soda
- ¼ tsp salt
For the Filling
- 2 cups (480g) coconut yogurt
- 1½ cups (210g) frozen cherries
How to Make Chocolate Cherry Ice Cream Sandwiches
Step 1: Preheat the Oven
Preheat your oven to 350°F (175°C). This ensures that your cookies bake evenly right from the start.
Step 2: Make the Cookies
In a mixing bowl, combine all cookie ingredients until smooth.
1. Scoop dough onto a baking sheet lined with parchment paper.
2. Flatten each scoop slightly with the back of a spoon.
3. Bake for 8–10 minutes until edges are firm but centers are soft.
4. Allow cookies to cool completely on a wire rack.
Step 3: Prepare the Filling
Using a blender or food processor:
1. Blend the coconut yogurt and frozen cherries until smooth and creamy.
2. Taste and adjust sweetness if necessary by adding more maple syrup if desired.
Step 4: Assemble the Sandwiches
Spread about 2 tablespoons of cherry filling on the bottom side of one cookie.
1. Top with another cookie, pressing gently to form a sandwich.
2. Repeat until all cookies are filled.
Step 5: Freeze and Serve
Place assembled sandwiches in the freezer for 1–2 hours until firm.
Enjoy them straight from the freezer for an irresistible treat!
How to Serve Chocolate Cherry Ice Cream Sandwiches
Serving Chocolate Cherry Ice Cream Sandwiches is just as fun as making them! These treats are perfect for gatherings, parties, or a cozy night in. Here are some delightful serving suggestions that will elevate your dessert experience.
Classic Presentation
- Serve the sandwiches on a chilled plate to keep them firm and refreshing.
Toppings Galore
- Add a drizzle of chocolate sauce on top for an extra touch of sweetness.
Fresh Fruit Garnish
- Pair with fresh cherries or berries on the side for a colorful and tasty contrast.
Ice Cream Bar Style
- Set up a DIY ice cream sandwich bar with additional toppings like nuts, sprinkles, or whipped coconut cream.
Mini Sandwiches
- Cut the sandwiches in half for smaller bites, perfect for sharing during gatherings.
How to Perfect Chocolate Cherry Ice Cream Sandwiches
Achieving the ideal Chocolate Cherry Ice Cream Sandwiches involves a few simple techniques. Follow these tips to ensure your treats are always a hit!
- Use room temperature ingredients: This helps create a smoother cookie dough that bakes evenly.
- Choose ripe cherries: Fresh or frozen, ripe cherries enhance the flavor of your filling, making it more delicious.
- Don’t overbake: Keep an eye on the cookies while baking; they should be soft in the center for the best texture.
- Freeze before serving: Allowing the sandwiches to freeze fully ensures they hold their shape and are easy to bite into.
Best Side Dishes for Chocolate Cherry Ice Cream Sandwiches
Pairing side dishes with Chocolate Cherry Ice Cream Sandwiches can enhance your dessert experience. Here are some delightful options to consider.
- Fruit Salad: A refreshing mix of seasonal fruits adds brightness and balances out the richness of the ice cream sandwiches.
- Chocolate-Dipped Strawberries: These indulgent treats complement the flavors of chocolate and cherry perfectly.
- Nutty Granola: Crunchy granola provides texture and makes a great topping when served alongside the sandwiches.
- Coconut Whipped Cream: Light and airy, this creamy addition pairs well without overpowering the main dessert.
- Chilled Herbal Tea: A refreshing herbal tea can cleanse the palate between bites of rich dessert flavors.
- Peanut Butter Bliss Balls: These no-bake snacks offer a nutty flavor that works well with chocolate desserts.
Common Mistakes to Avoid
Avoiding common pitfalls can elevate your Chocolate Cherry Ice Cream Sandwiches experience. Here are some mistakes to watch for:
- Using the wrong type of nut butter: Always opt for a smooth and creamy nut butter like Chocolate SunButter. Chunky variations can affect the texture of your cookies.
- Not measuring ingredients accurately: Precision is key in baking. Use a kitchen scale or measuring cups to ensure that you have the right amounts for optimal results.
- Skipping the cooling step: Allow the cookies to cool completely before assembling. This prevents melting and keeps your sandwiches intact.
- Overmixing the cookie dough: Mix only until combined; overmixing can lead to tougher cookies. Aim for a smooth batter without lumps.
- Not freezing long enough: Ensure your sandwiches freeze for at least 1-2 hours. This helps them hold their shape when serving.

Storage & Reheating Instructions
Refrigerator Storage
- Keep Chocolate Cherry Ice Cream Sandwiches in an airtight container.
- They can be stored in the refrigerator for up to 3 days.
Freezing Chocolate Cherry Ice Cream Sandwiches
- For longer storage, place sandwiches in a freezer-safe container.
- They will remain fresh for up to 2 months if properly sealed.
Reheating Chocolate Cherry Ice Cream Sandwiches
- Oven: Preheat to 350°F (175°C) and warm sandwiches for about 5-7 minutes until soft.
- Microwave: Heat on high for 10-15 seconds, checking frequently to avoid melting.
- Stovetop: Use a non-stick skillet over low heat, warming each sandwich for about 1 minute per side.
Frequently Asked Questions
If you have questions about making Chocolate Cherry Ice Cream Sandwiches, you’re not alone! Here are some commonly asked questions:
Can I use fresh cherries instead of frozen?
Yes, you can use fresh cherries, but you may need to freeze them briefly after blending with yogurt.
How do I customize my Chocolate Cherry Ice Cream Sandwiches?
Feel free to add different fruits or nuts into the filling or substitute other nut butters for varied flavors.
Are these sandwiches gluten-free?
Absolutely! The recipe does not include any flour, making them naturally gluten-free.
How many servings does this recipe make?
This recipe yields approximately 6–8 sandwiches, perfect for sharing or enjoying throughout the week.
Final Thoughts
Chocolate Cherry Ice Cream Sandwiches are a delightful treat that combines rich chocolate with refreshing cherry goodness. Their easy-to-make nature and customizable options make them perfect for any occasion. Whether you’re enhancing them with different fruits or enjoying them as is, these sandwiches are sure to impress!
Chocolate Cherry Ice Cream Sandwiches

Indulge in the delightful combination of rich chocolate and sweet cherry with these Chocolate Cherry Ice Cream Sandwiches. Perfect for any occasion, these treats are not only easy to make but also a healthier dessert option since they are dairy-free and flourless. Each sandwich features fudgy chocolate cookies paired with creamy cherry ice cream, creating a mouthwatering experience that’s bound to impress your guests or provide a refreshing snack on a warm day. With their simple ingredients and customizable options, you can whip up these delicious treats in no time.
- Prep Time: 15 minutes
- Cook Time: 10 minutes
- Total Time: 25 minutes
- Yield: Approximately 6–8 sandwiches 1x
- Category: Dessert
- Method: Baking
- Cuisine: Sweet
Ingredients
- 1 cup Chocolate SunButter
- ⅓ cup maple syrup
- 1 tbsp tapioca starch
- ½ tsp baking soda
- ¼ tsp salt
- 2 cups coconut yogurt
- 1½ cups frozen cherries
Instructions
- Preheat oven to 350°F (175°C).
- In a mixing bowl, combine Chocolate SunButter, maple syrup, tapioca starch, baking soda, and salt until smooth.
- Scoop dough onto a parchment-lined baking sheet and flatten slightly. Bake for 8–10 minutes until edges are firm and centers are soft; cool on a wire rack.
- Blend coconut yogurt and frozen cherries until creamy; adjust sweetness if desired.
- Spread the cherry filling on one cookie and top with another to form a sandwich. Freeze for 1–2 hours before serving.
Nutrition
- Serving Size: 1 sandwich (approx. 115g)
- Calories: 250
- Sugar: 20g
- Sodium: 150mg
- Fat: 15g
- Saturated Fat: 9g
- Unsaturated Fat: 6g
- Trans Fat: 0g
- Carbohydrates: 30g
- Fiber: 5g
- Protein: 4g
- Cholesterol: 0mg